

Vegetative propagation methods for currants: cuttings, layering and dividing the bush
Obviously, it was no coincidence that you got to this material, because you are looking for information on how to propagate currants on your own in one of the vegetative ways, right?
Well, then you will learn how to cut currants, propagate by layering and dividing the bush.

Content
How and when to propagate currants: terms and methods
All warm seasons of the year are suitable for breeding currants.
In other words, if for some reason you did not have time to propagate the currants in the spring, then this can be easily done in the fall.
The optimal time, as a rule, depends on the chosen method of propagation of currants:
- Layers can be added as early spring (in April)when only will be swell kidneysand late summer-autumn (August-September).
However, in the spring, you can even drop in layers on which the buds have already blossomed (you just need to remove the leaves in the place of the prikop).
- Green cuttings planted in soil in early summer, a lignified — in the fall (or in the spring, if there is a desire to engage in their winter storage).
- Reproduction dividing the bush you can spend as early spring as late autumn.
Breeding methods for currants
In general, there are 2 ways of vegetative propagation of currants - this is cuttings and propagation by layering. But you can also distinguish 3 methods - reproduction by dividing the bush.
Black, white and red the currants are propagated equally.
Layers
Even a novice summer resident can propagate currants by layering, because this is the easiest and simplest way to reproduce not only currants, but also many other berry bushes (suitable for gooseberry, blackberry, honeysuckle and barberry).
Step-by-step instructions for propagating currants by layering:
- Choose the most conveniently located 1-year-old shoots (without side branches), directed away from the bush (so that it is convenient for you to bend them down in the future).
- Now these shoots need to be bent to the soil and fixed, for example, by pressing them with hairpins (brackets, hooks, electrodes), and then cover them with loose fertile soil (but no more than 2-3 cm).
- Or, lay them in shallow (no more than 2-3 cm) grooves (trenches, grooves) dug in advance, also pin the shoots to the ground with staples and again cover with loose soil.

Important! The top of the shoot does not need to be buried; it must be left above the soil surface (as an option, you can tie it to a peg).
- Water abundantly.
- Now you need to water regularly, maintaining the necessary minimum moisture, so that the buried shoots will quickly root (take root).
- Depending on when you rooted the layers, already in the fall of this year or next spring, when roots are formed in the place of the trench, it will be possible to separate (cut off) new young seedlings with 1-2 vertical shoots from the mother plant and transplant to a permanent place (first you should dig up everything, and then divide).
Advice! The site has detailed material about how to transplant currants in spring, summer and autumn.
- Eventually from one long layering you can get it up to 4-6 new young seedlingsif you multiply vertical layering... Or 1 powerful sapling, if - arched.
By the way! The site already has detailed materials about how to plant currant seedlings in spring and in the fall.
Video: reproduction of currants by layering
Cuttings (green and lignified, including in water)
No less willingly than by layering, currants propagate by cuttings, which very easily take root in the soil (with regular watering). In this case, you can plant directly into open ground, or you can pre-germinate at home, for example, in water or in a glass with soil.
Advice! Cuttings should be taken from the most productive and healthy bushes, not affected by any diseases and pests, which have a good one-year growth.
Green cuttings
Step-by-step instructions for planting green currant cuttings in spring in open ground:
Important! Prepare in advance a school (cuttings) where you will root the cuttings. In this case, the bed (place) should be in a sufficiently shaded place (in no case in the sun), and the soil must be loose and light (it is advisable to add sand and humus).
- In late spring-early summer (late May-early June), you need to cut cuttings 10-15 cm long, which will have at least 3 or more buds.
The lower cut is made at an angle of 45 degrees to increase the area of absorption of moisture by the handle, and the upper cut at a right angle to reduce moisture evaporation.
- Remove all leaves except the top 2.
For guaranteed rooting, the lower part of the cuttings can be processed (soaked or powdered) in one of the root formation stimulants (Kornevin, Heteroauxin).
- Bury the cuttings in the soil at an angle (at an angle of 45 degrees), leaving only 1 bud and leaves above the surface. In this case, the distance between the cuttings in the school should be about 10-15 cm.

Many people plant cuttings vertically, and the result is quite decent.
- Further care is reduced to daily watering for 2-3 weeks. In no case should the soil dry out; the cuttings should always be in slightly moistened soil.
Advice! Alternatively, you can put a greenhouse on arches to maintain moisture.
- Already in the fall of this year, under favorable conditions, the cuttings will take root, and they can be dug up and transplanted to a permanent place. But it is better to do this in the spring of next year.
Lignified cuttings
If you decide to cut currants in the fall (in September-October), then you need to prepare cuttings from lignified and well-ripened growths of this year (annual shoots), as thick as a pencil (not thinner than 5 mm).
So the instruction for the autumn planting of cuttings in the school next:
- In advance, select and prepare a place for a school (cuttings): it should be relatively shady, and the soil must be loose and light (it is advisable to add sand and humus).
- Cut the cuttings 15-20 cm long, while making an oblique cut from the bottom under the kidney, and from the top - straight.
- Remove all the leaves on them (if they do not fly around on their own by this time).
- Now you need tilted (at an angle of 45 degrees) stick the cuttings almost the entire length into the soil, leaving only 1, maximum 2 buds above the surface. At the same time, the distance between the cuttings in the school should be at least 10 cm, or better - 12-15 cm (if you plant in several rows, then in the aisles - 30-50 cm).
![]()
By the way! Many people plant cuttings vertically, and the result is quite decent.
- Water abundantly if you have not done so beforehand (before planting the cuttings).
- If you live in a cold and snowless region, then before the onset of frost, the cuttings can be covered (insulated for the winter), for example, by mulching with fallen leaves, needles (spruce branches). But for example in the middle lane (Moscow region) this is not necessary at all.
- In the fall of next year, rooted cuttings can be dug up and transplanted to a permanent place.
When digging, you need to preserve the root system as much as possible. This is very important for successful settling in a new place.
Video: propagation of currants by cuttings in autumn
In general, woody cuttings harvested in the fall do not have to be planted immediately, they can keep in winter and plant in spring or even in winter.
Interesting! Some summer residents even cut such woody cuttings in spring (so as not to store them) and immediately plant them in open ground (in April-early May), while the ground is still wet, but already thawed (to the planting depth).
Video: reproduction of currants by lignified cuttings in spring
Alternatively, even in winter (in February) or in early spring (in March) you can plant the cuttings in cups with loose soil, and when leaves and roots are formed on them, then plant in open ground (about one and a half to two months after planting).
However, still top scores shows preliminary germination of currant cuttings in water (with subsequent planting in containers with loose soil and further transplanting into open ground).

Video: grafting of currants in winter - germination in water and rooting in cups with soil
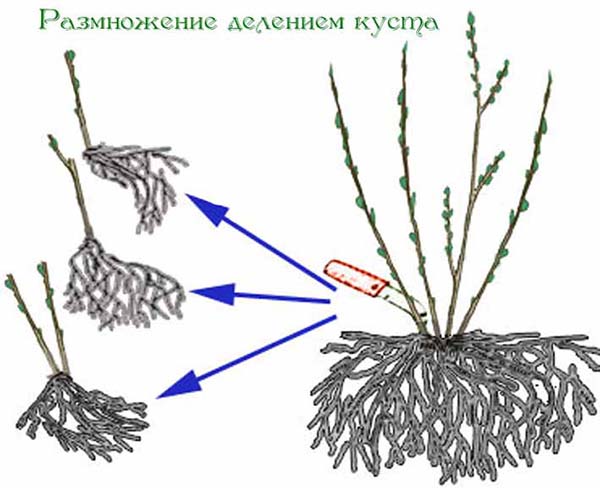
By dividing the bush
If for some reason you cannot or do not want to propagate the currants by cuttings or layering, then you can divide the bush into parts.
How to do it?
- First, you need to carefully dig out the mother bush itself, while minimally damaging the root system is very important.
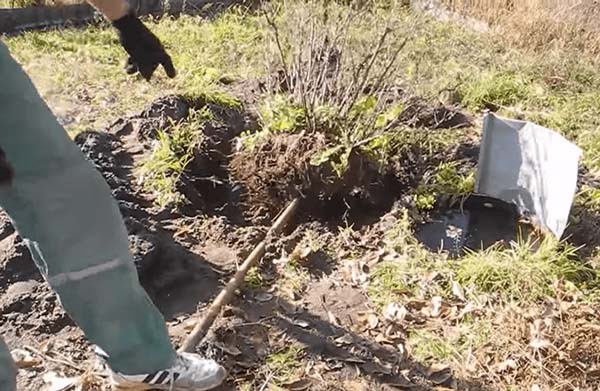
- Next, actually divide the bush into several parts with a knife or secateurs.
- Sprinkle the sections with ash or crushed activated carbon (so that they heal faster).
- Plant the resulting delenki-seedlings in the standard way.
Advice! The site has a separate article about how to transplant currants in spring, summer and autumn.
Well, now you know how you can get a lot of currant seedlings. Forward!